Using FastSky
Quick Start
- Step 1 : Create a new material using the shader,
Norex/FastSky. - Step 2 : Enable desired features like clouds, moon, and stars by checking their respective boxes.
- Step 3 : Configure your skybox settings (refer to the section below for details).
- Done!
FastSky Material
The FastSky material editor has two sections: Sky and Clouds. Use the navigation button below the settings to switch between them.
Sky
This section consists of the below sub-sections
- Atmosphere
This section determines how the atmosphere is rendered. It supports Physically Based Sky and Cubemap sky rendering.
Both options can be enabled both not disabled.
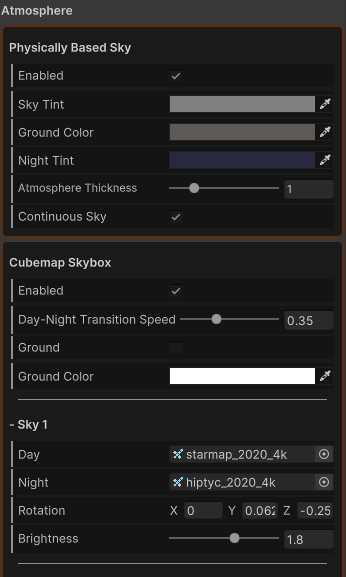
Physically Based Sky
| Property | Description |
|---|---|
| Sky Tint | This setting controls the atmospheric scattering. For Earth-like atmospheres, use a grayscale tint, as it influences the atmospheric scattering wavelength. For alternative atmospheres, use custom colors. |
| Ground Color | The color of the ground. |
| Night Tint | The color of the sky at night |
| Atmosphere Thickness | This property enhances the Rayleigh scattering constant. Increase its value to achieve a more reddish sunset and sunrise. |
| Continuous Sky | This option prevents seams by rendering the ground as the flipped sky, creating a seamless transition between the sky and the ground |
Cubemap Sky
| Property | Description |
|---|---|
| Enabled | Enables cubemap skybox rendering. |
| Day Night Transition | The speed at which the sky transitions from day to night based on the suns direction. |
| Ground | Enables ground rendering |
| Ground Color | The color of the ground |
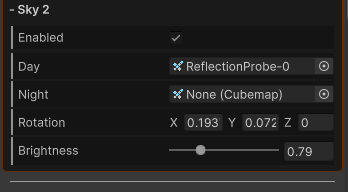
Cubemap Sky Element
| Property | Description |
|---|---|
| Enabled | Enables this cubemap sky element (only avialable for Sky 2) |
| Day | Day-time cubemap sky |
| Night | Night-time cubemap sky |
| Rotation | Rotation vector of this sky (relative to time) |
| Brightness | Brightness of this sky |
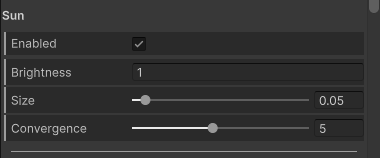
- Sun
| Property | Description |
|---|---|
| Enabled | Toggles the sun's visibility. |
| Brightness | Controls the sun's intensity. |
| Size | Adjusts the sun's visual size. |
| Convergence | Concentrates the sun's intensity towards its direction. |
- Moon
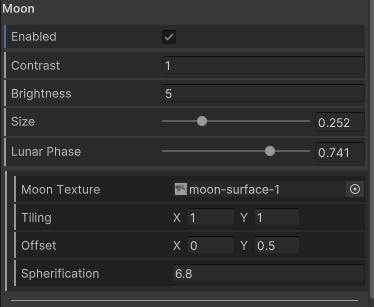
Currently, the moon is always positioned opposite the sun, meaning it won't appear during the daytime.
While the moon's direction should ideally depend on both the sun's direction and the moon's Lunar Phase, we've found this effect usually necessary for most applications. We might make this customizable in future versions.
| Property | Description |
|---|---|
| Enabled | Toggles the visibility of the moon. |
| Contrast | Enhances the moon's surface: dark areas become darker, and light areas become lighter. |
| Brightness | Adjusts the moon's brightness |
| Lunar Phase | Controls the illuminated portion of the moon. 0.0->New Moon (invisible), 0.5->Full Moon. Note: Physically, this property should affect the moon's direction, but this might not be relevant for most use cases. |
| Moon Texture | The texture applied to the moon's surface. |
| Tiling | Controls the tiling of the moon texture. |
| Offset | Adjusts the moon texture's offset, creating a rotation illusion depending on the Spherification setting. |
| Spherification | Applies spherical projection to the moon's texture coordinates. |
- Stars
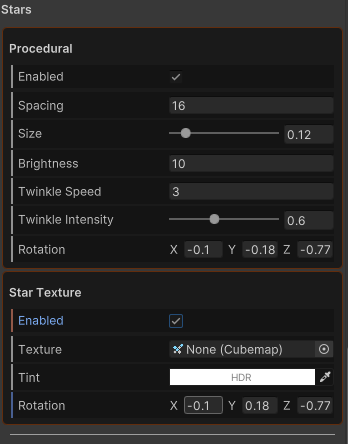
Procedural
| Property | Description |
|---|---|
| Enabled | Toggles the star field's visibility. (Procedural) |
| Spacing | Controls the density of the star field |
| Size | Adjusts the size of the star field. |
| Brightness | Controls the brightness of the star field. |
| Twinkle Speed | Determines how fast stars twinkle. |
| Twinkle Intensity | Controls the strength of the twinkling effect. |
| Rotation | Rotation vector (relative to time) |
Texture
| Property | Description |
|---|---|
| Enabled | Toggles the star field's visibility (Texture) |
| Texture | Star cubemap texture |
| Tint | Star tint |
| Rotation | Rotation vector (relative to time) |
- Exposure

Finally, there's a value that controls the overall exposure of the skybox. Below this, is the navigation button which leads you to the next section (Clouds)
NOTE
The Exposure property affects both the intensity of the sky and the clouds.
Clouds
- Global Settings
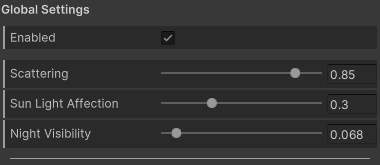
These are settings perculiar the all cloud layers.
| Property | Description |
|---|---|
| Enabled | Toggle's the visibility of all cloud layers. |
| Scattering | The cloud scattering coefficient, resulting in the effect of the clouds being illuminated by the sun. Increasing this value concentrates the intensity of the clouds lit near the sun. |
| Sun Light Affection | Controls how much the clouds are affected by the sun's color and intensity. |
| Night Visibility | Controls the visiblity of the clouds at night |
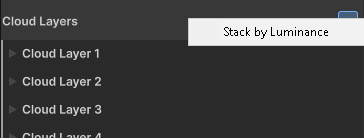
- Cloud Layers
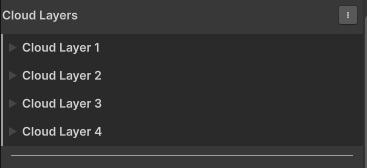
You can utilize up to four cloud layers in the atmosphere. For optimal results, two cloud layers are often sufficient.
Cloud layers are stacked, with Layer 4 at the top, followed by Layer 3, Layer 2, and Layer 1.
It's often common for lighter cloud layers to be above darker ones. You can quickly achieve this by clicking the ⋮ button next to the cloud layers dropdown and selecting "Stack By Luminance." This automatically arranges lighter clouds at the top and darker clouds below.
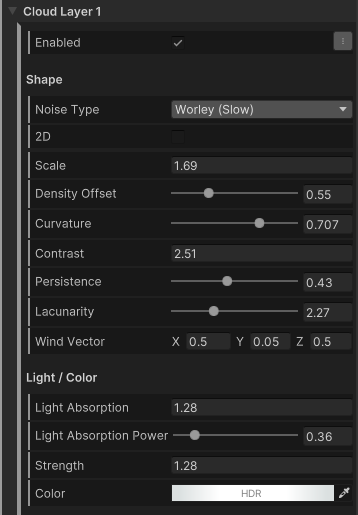
Settings

| Property | Description |
|---|---|
| Enabled | Toggles this cloud layer's visibility. |
| SHAPE | - |
| Noise Type | Cloud density sampling function. Using worley noise tends to give you a more cloud-like shapes. Below is a list of noise functions and their computational cost value. 1. Worley - Expensive(5) 2. Worley Fast - Cheap(1) 3. Value - Cheap(1) 4. Simplex - Cheap (2) Using fast Worley might result in discontinuities at times, but these are often unnoticeable. Therefore, it's not strictly necessary to use the slower Worley function unless you're targeting high-end devices or require extreme accuracy. |
| 2D | Uses 2D noise functions instead. While significantly faster than their 3D counterparts, 2D noise functions have the below limitations. 1. Using a Curvature > 0.6 can cause peculiar stretching along the Y-axis. 2. Clouds may appear static as they move with the wind. A workaround is to enable the Detail feature of the cloud layer, which uses an additional noise field to erode cloud edges, adding dynamism. 3. The curvature limit can result in overly straight-looking clouds |
| Scale | The scale/size of the cloud layer |
| Density Offset | Reducing this value creates more distinct and smaller cloud shapes. |
| Curvature | Determines how clouds conform to atmospheric curvature. Higher values create the illusion of the cloud layer being distant when viewed from above (Zenith) and closer when viewed forward (Horizon). If 2D Clouds are enabled, a cloud curvature greater than 0.6 can cause undesirable stretching along the Y-axis. |
| Contrast | Increasing this value makes denser cloud areas more pronounced and less dense areas more transparent. Decreasing this value below 1 starts to neutralize the cloud's density. |
| Persistence | The rate at which the strength of noise layers making up this cloud layers changes. This controls the level of detail of the cloud layer. |
| Lacunarity | The rate at which the frequency of noise layers making up this cloud layer changes. This also controls the level of detail of the cloud layer. |
| Wind Vector | Controls the direction and speed of the cloud layer |
| LIGHT/COLOR | - |
| Light Absorption | Approximates light absorption. Increasing this value would result in the darkening of the denser regions of the cloud layer |
| Light Absorption Power | Controls the concentration/dilution of light absorption based on the cloud's density. |
| Strength | Controls the overall visibility of the cloud |
| Color | Cloud color tint |
| MASK | - |
| Distance Mask | Masks the clouds from the horizon (forward) to the zenith (top). Usually, you might want to mask the cloud layer slightly at the horizon to prevent sharp blending between the sky and the ground. |
| Distance Blend (Horizon, Min) | Controls the sharpenss of the mask at the horizon |
| Distance Blend (Zenith, Max) | Controls the sharpness of the mask at the zenith |
| DETAIL | - |
| Enabled | Toggles cloud detail. While this option works for all noise dimensions, it is often used to add dynamism to 2D clouds, as they are inherently static. |
| Detail Weight | Controls how strongly the detail noise erodes from the base cloud. |
| Detail Wind Speed | Sets the wind speed for cloud detail, relative to this cloud layer's Wind Vector. A negative value usually produces a more noticeable effect. |
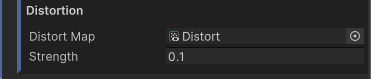
| DISTORTION | - |
| Distort Map | Used to distort cloud shapes. Follow these steps to create. |
| Strength | The intensity of the distortion |
Creating Distort Maps
Distort maps are textures that are used to displace the sample position of the cloud density function. In essence, they distort the cloud shapes, there by adding detail and swirly patterns. These maps are static, therefore, it is created at runtime when it is needed.
To create and manipulate theses maps, follow the steps below:
- Navigate to
Tools/Fast Sky/Create Distort Mapto create a distort map and save it in your desired location. - Select the distort map and adjust the settings to achieve your desired look.
- Open the distort map's children to find the texture. Apply this texture as the distort map on your Fast Sky material.
Sky Blending
As of version 1.1.0, Fast Sky supports sky blending. This feature lets you linearly interpolates between two atmospheres based on a time value t.
- Create your initial Fast Sky material.
- Duplicate it and modify the settings to represent your final atmosphere state.
- Create a new script named 'SkyMix' and paste the provided code.
- Run the scene to see the results!
using UnityEngine;
using FastSky;

public class SkyMix : MonoBehaviour
{
    public Material start;
    public Material end;
    public float speed = 0.5f;

    FastSkyMixer mixer;
    float t;

    void Start()
    {
        mixer = new FastSkyMixer(start, end);
        RenderSettings.skybox = mixer.GetMaterial(); // Assign skybox
    }

    void Update()
    {
        mixer.Mix(t);
        t = Mathf.Clamp01(t + Time.deltaTime * speed);
    }
}